📌 What is Secure Boot?
Secure Boot ensures that your system boots only with digitally signed (trusted) software.
Purpose: To block threats like bootkits or rootkits.
🔧 In many cases—such as Linux installs, custom ISOs, or system modding—Secure Boot must be disabled.
📍 General Steps
- Restart your computer.
- Enter BIOS/UEFI setup. (Usually DEL, F2, ESC, F10, F12)
- Locate the following menus:
Security,Boot,Authentication, orAdvanced - Find the Secure Boot setting:
Switch betweenEnabled(On) andDisabled(Off). - If the setting is grayed out or not editable:
- Enable CSM (Compatibility Support Module)
- Or enable Legacy Mode
- Save changes and exit using F10
🔵 ASUS
- BIOS Key:
DEL/F2 - Path:
Boot > Secure Boot > OS Type→ Select Other OS - Set Secure Boot to
Disabled - You may need to go to Key Management and select Clear Secure Boot Keys
🔴 MSI
- BIOS Key:
DEL - Path:
Settings > Security > Secure Boot - Set Secure Boot Mode to
Disabled - Also check:
Settings > Boot > CSM→ Enable if needed
🟠 Gigabyte
- BIOS Key:
DEL - Path:
BIOS Features > Secure Boot - If not visible:
- Set
CSM SupporttoEnabled - Then Secure Boot options will appear
- Set
🔷 Lenovo (Laptop / ThinkPad)
- BIOS Key:
F1/Fn + F2or press the Novo Button - Path:
Security > Secure Boot - Before making changes:
- Switch Secure Boot Mode to
Custom - Then you can disable Secure Boot
- Switch Secure Boot Mode to
🟤 HP
- BIOS Key:
ESC, then pressF10 - Path:
System Configuration > Boot Options > Secure Boot - You may need to clear Secure Boot keys from Key Management
🔵 DELL
- BIOS Key:
F2 - Path:
Boot Configuration > Secure Boot - Sometimes you must enable Legacy ROMs before Secure Boot can be modified
🔷 Acer
- BIOS Key:
F2 - If Secure Boot is grayed out:
- Set a Supervisor Password (under
Securitytab) - After setting the password, Secure Boot can be changed
- Set a Supervisor Password (under
- Also check:
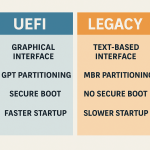
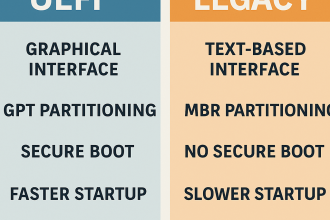
Boot Mode→ UEFI or Legacy
🟣 Toshiba
- BIOS Key:
F2/ESC - Path:
Security > Secure Boot - May require a Supervisor Password to change settings
⚫ Monster Notebooks (Tulpar, Abra Series)
- BIOS Key:
DEL - Path:
Security > Secure Boot - Change Secure Boot Mode from
Standard→Custom - Then set Secure Boot to
Disabled - Save and exit with
F10 - ⚠️ For some models:
PressFn + Tab, reboot, and the Advanced BIOS screen will appear
⚠️ Notes
- When Secure Boot is disabled, Windows installations may skip digital signature warnings
- For Linux distros (Kali, Parrot, Hiren’s Boot, Ventoy, etc.), Secure Boot usually must be disabled
- Windows 11 requires Secure Boot and TPM to be enabled — disabling it may block installation